Installation
This tutorial demonstrates how to install manually a StratusLab cloud infrastructure using the StratusLab system administrator command line utilities. A minimal StratusLab cloud consists of two physical machines, although additional machines may be necessary if the internet cannot be accessed.
Installation Overview
The StratusLab distribution provides a simple command line client to install, configure and start the StratusLab Cloud services and components.
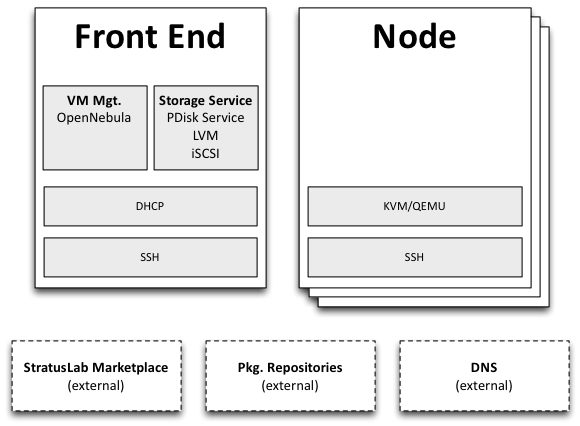
The default deployment has two types of machines:
- Front-End - machine for VM management and storage services
- Node - machine that hosts virtual machines
A quick overview of the procedure is:
- Ensure all prerequisites are satisfied.
- Define all of the StratusLab service parameters.
- Install and configure the Front End, containing the VM management service (OpenNebula) and the storage management (Persistent Disk) service.
- Install and configure the Node(s) via SSH from the Front End. By default KVM is used for the hypervisor on the Node(s).
- Validate the installation by starting a virtual machine.
Minimal StratusLab Cloud
Prerequisites
Physical Machines
This tutorial demonstrates a minimal installation of a StratusLab cloud on two physical machines. The physical machines should be relatively modern machines with the following minimum characteristics:
- 1 64-bit multicore CPU (>= 4 cores) with VT-x extensions
- 4 GB of RAM
- 200 GB local disk space
The hardware virtualization extensions must be enabled in the BIOS on the “Node” machine. Many vendors ship machines with these extensions disabled.
In general cloud infrastructures prefer “fat” machines, that is machines that have a maximum number of CPUs, RAM, and disk space as possible. This is because the maximum size of a single virtual machine is limited by the size of the largest physical machine.
Operating System
Install a minimal version of CentOS 6 on the two physical machines that will be used for the cloud infrastructure.
Disable SELinux
The SELinux system must be disabled on all of the machines. Normally
this is enabled by default. To disable SELinux, ensure that the file
/etc/selinux/config has the following line:
SELINUX=disabled
You must reboot the machine for this to take effect.
Python Version
The default version of Python installed with CentOS should be correct. StratusLab requires a version of Python 2 with a version 2.6 or later. The StratusLab command line tools do not work with Python 3.
Verify that the correct version of Python is installed:
$ python --version
Python 2.6.6
Disk Configuration
StratusLab allows for a variety of storage options behind the persistent disk service. The tutorial uses the defaults using LVM and iSCSI.
The machines must be configured to use LVM for the disk storage.
The Front End must be configured with two LVM groups: one for the base operating system (~20 GB) and one for the StratusLab storage service (remaining space).
The “Node” machine can be configured with a single LVM group.
Below, we assume that the volume group names are “vg.01” for the operating system and “vg.02” for the StratusLab storage service. You can use other names, but then change the commands below as necessary.
Package Repositories
The StratusLab installation takes packages from four yum repositories:
- The standard CentOS repository,
- The EPEL 6 repository,
- The StratusLab repository, and
- The IGTF Root Certificates.
The configuration for the CentOS repository is done when the system is installed. The others require additional configuration.
To configure both the Front End and Node for the EPEL repository, do the following:
$ wget -nd http://mirrors.ircam.fr/pub/fedora/epel/6/i386/epel-release-6-8.noarch.rpm
$ yum install -y epel-release-6-8.noarch.rpm
This will add the necessary files to the /etc/yum.repos.d/
directory.
To configure both the Front End and Node for the StratusLab
repository, put the following into the file
/etc/yum.repos.d/stratuslab.repo:
[StratusLab-Releases]
name=StratusLab-Releases
baseurl=http://yum.stratuslab.eu/releases/centos-6.2-v13.02/
gpgcheck=0
replacing the URL with the version you want to install.
Although not strictly necessary, it is advisable to clear all of the yum caches and upgrade the packages to the latest versions:
$ yum clean all
$ yum upgrade -y
This may take some time if you installed the base operating system from old media.
DNS and Hostname
Ensure that the hostname is properly setup on the Front End and the Node. The DNS must provide both the forward and reverse naming of the nodes. This is required for critical services to start.
You can verify this on both the Front End and the Node with the command:
$ hostname -f
Set the hostname if it is not correct.
Throughout this tutorial we use the variables $FRONTEND_HOST ($FRONTEND_IP) and $NODE_HOST ($NODE_IP) for the Front End and Node hostnames (IP addresses), respectively. Change these to the proper names for your physical machines when running the commands.
SSH Configuration
The installation scripts will automate most of the work, but the scripts require password-less root access:
- From the Front End to each Node and
- From the Front End to the Front End itself
Check to see if there is already an SSH key pair in
/root/.ssh/id_rsa*. If not, then you need to create a new key pair
without a password:
$ ssh-keygen -q
Enter file in which to save the key (/root/.ssh/id_rsa):
/root/.ssh/id_rsa already exists.
Overwrite (y/n)? y
Enter passphrase (empty for no passphrase):
Enter same passphrase again:
Now ensure that you can log into the Front End from the Front End without needing a password. Do the following:
$ ssh-copy-id $FRONTEND_HOST
The authenticity of host 'onehost-5.lal.in2p3.fr (134.158.75.5)' can't be established.
RSA key fingerprint is e9:04:03:02:e5:2e:f9:a1:0e:ae:9f:9f:e4:3f:70:dd.
Are you sure you want to continue connecting (yes/no)? yes
Warning: Permanently added 'onehost-5.lal.in2p3.fr,134.158.75.5' (RSA) to the list of known hosts.
root@onehost-5.lal.in2p3.fr's password:
Now try logging into the machine, with "ssh 'onehost-5.lal.in2p3.fr'", and check in:

  .ssh/authorized_keys

to make sure we haven't added extra keys that you weren't expecting.
Do the same thing for the node:
$ ssh-copy-id $NODE_HOST
...
And verify that the password-less access works as expected.
$ ssh $FRONTEND_HOST

Last login: Mon May 27 14:26:29 2013 from mac-91100.lal.in2p3.fr
#
# exit
logout
Connection to onehost-5.lal.in2p3.fr closed.

$ ssh $NODE_HOST

Last login: Mon May 27 14:26:43 2013 from mac-91100.lal.in2p3.fr
#
# exit
logout
Connection to onehost-6.lal.in2p3.fr closed.
Now that SSH is properly configured, the StratusLab scripts will be able to install software on both the Front End and the Node.
DHCP Server
A DHCP server must be configured to assign static IP addresses corresponding to known MAC addresses for the virtual machines. These IP addresses must be publicly visible if the cloud instances are to be accessible from the internet.
If an external DHCP server is not available, the StratusLab installation command can be used to properly configure a DHCP server on the Front End for the virtual machines.
This uses a DHCP server on the Front End.
Network Bridge
A network bridge must be configured on the Node to allow virtual machines access to the internet. You can do this manually if you want, but the StratusLab installation scripts are capable of configuring this automatically.
This tutorial allows the installation scripts to configure the network bridge.
Front End Deployment
Deployment tool installation
The first step is to install the StratusLab system administrator command line client from the StratusLab repository on the Front End:
$ yum install -y stratuslab-cli-sysadmin
This will install the system administrator client and all of the necessary dependencies. You can verify that it is correctly installed by doing the following:
$ stratus-config --help

Usage: stratus-config [options] [key [value]]
If the [value] is not provided, the command returns the current value
of the key.
...
Configuration file customization
The entire StratusLab Cloud is configured from a single configuration
file /etc/stratuslab/stratuslab.cfg. This file contains many
options, but only a few are required.
StratusLab ships with a default configuration file in the standard
location and a reference configuration file located in
/etc/stratuslab/stratuslab.cfg.ref.
To simplify viewing the configuration parameters and changing them, the
stratus-config command can be used.
To list the content of the configuration, and show the differences
between the stratuslab.cfg file and the reference configuration, you
can use the -k or --keys option:
$ stratus-config -k

... lots of parameter values! ...
To change a value, specify the key and the new value. To view a single value, simply specify the key.
We will use this command to set the various configuration parameters below.
VM Management Service
The parameters for the frontend and VM management:
$ stratus-config frontend_system centos
$ stratus-config frontend_ip $FRONTEND_IP
Storage Service
Similar parameters must also be set for the Persistent Disk service.
For this tutorial, this service is installed on the Front End, so the same IP address should be used.
$ stratus-config persistent_disk_system centos
$ stratus-config persistent_disk_ip $FRONTEND_IP
$ stratus-config persistent_disk_merge_auth_with_proxy True
The Persistent Disk service and the Nodes communicate using a strategy
defined by the persistent_disk_storage and persistent_disk_share
parameters. The default values (“lvm” and “iscsi”, respectively) will be
used for this tutorial.
One needs to specify what device will be used for the physical storage for the Persistent Disk service:
$ stratus-config persistent_disk_lvm_device /dev/vg.02

# Provide detailed parameters for storage backend plugins.
# (NOTE: The opening and closing single quotes!)
$ stratus-config persistent_disk_backend_sections '
[%(persistent_disk_ip)s]
        type=LVM
        volume_name = /dev/vg.02
        lun_namespace = stratuslab
        volume_snapshot_prefix = pdisk_clone
        initiator_group =
'
If you’ve used another name for the LVM volume group, then change the above command.
Network configuration
Use the frontend as the general gateway for the cloud:
$ stratus-config default_gateway $FRONTEND_IP
Set the IP and mac addresses for virtual machines:
$ stratus-config one_public_network_addr \
    134.158.xx.yy 134.158.xx.yy 134.158.xx.yy

$ stratus-config one_public_network_mac \
    0a:0a:86:9e:49:2a 0a:0a:86:9e:49:2b 0a:0a:86:9e:49:2c
In this example, the Front-End is configured on IP address $FRONTEND_IP and three IP/MAC address pairs are defined for virtual machines.
You must use the real values for the Front End IP addresses and for the range of addresses you will use for the virtual machines.
More network parameters are described in the “one-network” section in the reference configuration file.
DHCP Configuration
Allow the script to automatically configure and start the DHCP server on the Front End. Do the following:
$ stratus-config dhcp True
$ stratus-config dhcp_subnet 134.158.75.0
$ stratus-config dhcp_netmask 255.255.255.0
$ stratus-config dhcp_lease_time 3600

$ stratus-config dhcp_one_public_network True
$ stratus-config dhcp_one_local_network_routers $FRONTEND_IP
$ stratus-config dhcp_one_local_network_domain_name lal.in2p3.fr
$ stratus-config dhcp_one_local_network_domain_name_servers \
     134.158.91.80, 134.158.88.149
Use your values for these parameters!
Finalize Front End Installation
Now that we have defined all of the configuration parameters, you can now do the full Front End installation by issuing the following command:
$ stratus-install -vv
To get more details on what the command is (because of curiosity or
errors), use the option -v, -vv, or -vvv.
If you run into errors, the stratus-install command can simply be
rerun after adjusting the configuration parameters.
Node Deployment
The deployment of the StratusLab Nodes is done from the Front End, thus, all the commands below should be run from the Front End.
To add a Node to the cloud, specify the Linux distribution of the machine and indicate that the bridge should be configured:
$ stratus-config node_system centos
Request the automatic configuration of the network bridge:
$ stratus-config node_bridge_configure True
$ stratus-config node_bridge_name br0
$ stratus-config node_network_interface eth0
Check carefully the name of the interface on the node!
Invoke installation by
stratus-install -vv -n $NODE_IP
As before, you can increase the verbosity level by adding the option
-v or -vv.
User Configuration
At this point, you have both the Front End and one Node installed. This is a functional installation, but you have not yet authorized any users for the cloud. Here we will create a new StratusLab user account. Note that StratusLab accounts are independent of the Unix accounts on the machine itself.
Add the following line to the end of the file
/etc/stratuslab/authn/login-pswd.properties.
$ cat >> /etc/stratuslab/authn/login-pswd.properties
sluser=slpass,cloud-access
This creates a new StratusLab user ‘sluser’ with a password ‘slpass’. The group ‘cloud-access’ is mandatory for the user to have access to the cloud services. (Crypted or hashed password values are also allowed in the configuration.)
The StratusLab distribution supports other authentication methods (LDAP, X509 certificates, X509 proxies, etc.), but a username/password pair is the simplest for this tutorial.
StratusLab Client
Now we will test that the cloud functions correctly by starting a new virtual machine instance and logging into it. We’ll test the cloud service from a normal Unix user account on the Front End.
First, ensure that the StratusLab user client is installed on the machine. Do the following as root:
$ yum install -y stratuslab-cli-user
It is very likely that the user client commands are already installed.
(Note: For normal client installations, it is strongly recommended to use pip or easy_install with virtualenv. See the usual client installation instructions.)
Now create a normal Unix user for testing:
$ adduser sluser
Now log in as the user and setup the account for using StratusLab. An SSH key pair is required to log into your virtual machines and the client requires that a complete client configuration file.
Log in as the user and create an SSH key pair. This is similar to the process used for the root account on the machine.
$ su - sluser
$ ssh-keygen -q
...
Now copy the reference configuration file into place and edit the parameters.
$ mkdir ~/.stratuslab
$ cd ~/.stratuslab
$ cp /etc/stratuslab/stratuslab-user.cfg.ref ~/.stratuslab/stratuslab-user.cfg
$ vi ~/.stratuslab/stratuslab-user.cfg # endpoint, username, password
You will need to set the “endpoint”, “username”, and “password” parameters in this file. For the “endpoint” use the hostname or IP address of your Front End. For the “username” and “password” use “sluser” and “slpass”, respectively.
Everything should be setup now. So try deploying a virtual machine. You can look in the Marketplace to find an interesting machine to deploy. We’ll use a ttylinux image here. This is a micro distribution that boots very quickly and is ideal for tests.
# Deploy a ttylinux virtual machine.
$ stratus-run-instance BN1EEkPiBx87_uLj2-sdybSI-Xb

 :::::::::::::::::::::::::
 :: Starting machine(s) ::
 :::::::::::::::::::::::::
 :: Starting 1 machine
 :: Machine 1 (vm ID: 1)
 Public ip: 134.158.75.42
 :: Done!
Check the status of the machine as it starts:
# Check its status.  Pending -> not yet assigned to a Node
$ stratus-describe-instance
id  state     vcpu memory    cpu% host/ip                 name
1   Pending   1    0         0    vm-42.lal.stratuslab.eu one-1

# Check again.  Prolog -> resources for VM are being initialized
$ stratus-describe-instance
id  state     vcpu memory    cpu% host/ip                 name
1   Prolog    1    0         0    vm-42.lal.stratuslab.eu one-1

# Check again. Running -> hypervisor has started machine
$ stratus-describe-instance
id  state     vcpu memory    cpu% host/ip                 name
1   Running   1    0         0    vm-42.lal.stratuslab.eu one-1
When the machine reaches the ‘running’ status, the virtual machine is running in the hypervisor on the Node. It will probably take some additional time for the operating system to boot.
Verify that the machine has fully booted and is accessible from the network:
# Ping the virtual machine to see if it is accessible.
$ ping vm-42.lal.stratuslab.eu
PING vm-42.lal.stratuslab.eu (134.158.75.42) 56(84) bytes of data.
From onehost-5.lal.in2p3.fr (134.158.75.5) icmp_seq=2 Destination Host
 Unreachable
...
From onehost-5.lal.in2p3.fr (134.158.75.5) icmp_seq=8 Destination Host
 Unreachable
64 bytes from vm-42.lal.stratuslab.eu (134.158.75.42): icmp_seq=9
 ttl=64 time=1.44 ms
...

# Now login to the machine as root.
$ ssh root@vm-42.lal.stratuslab.eu

The authenticity of host 'vm-42.lal.stratuslab.eu (134.158.75.42)'
 can't be established.
RSA key fingerprint is
 6a:bd:f7:2d:b6:82:39:61:e6:ca:3f:c7:61:9d:72:31.
Are you sure you want to continue connecting (yes/no)? yes
Warning: Permanently added 'vm-42.lal.stratuslab.eu,134.158.75.42'
 (RSA) to the list of known hosts.


#       # <- we're logged into the ttylinux virtual machine
# exit  # just logout of the session
logout
Connection to vm-42.lal.stratuslab.eu closed.
Now the machine can be terminated:
$ stratus-kill-instance 1
Going through the full lifecycle of a machine shows that all of the services are working.
Conclusions
You’ve successfully installed a minimal StratusLab cloud. You can checkout the documentation to see what other configuration parameters are available or try the user tutorials to discover more of the StratusLab services.
You can get help on the installation or use of StratusLab through the support mailing list. You can also report bugs and provide feedback on the same list.