CIMI
StratusLab uses CIMI as its native user interface. CIMI is a standard from DMTF that provides a coherent, unified, RESTful API. The API covers all of the StratusLab cloud resources, including:
- Virtual machines
- Volumes for data storage
- Machine images or appliances
StratusLab has extended the interface to provide information to cloud users in “ServiceMessage” resources, configuration of the StratusLab services, and user management.
As the CIMI specification follows the usual REST patterns, the standard CRUD actions (create, read, update, and delete) are represented by:
- Create: HTTP POST to a resource collection URL,
- Read: HTTP GET to a resource URL,
- Update: HTTP PUT to a resource URL, and
- Delete: HTTP DELETE to a resource URL.
All of the resources are represented as JSON documents and contain metadata to allow users to understand what operations they can perform on the resource.
Service Overview
The CIMI service is the only StratusLab service accessible by users on a cloud infrastructure. All interactions between the user and the underlying resources occur through this service. This service also handles all of the user authentication for the cloud, passing verified authentication information to the underlying services.
The service is written in clojure and uses the Ring and Compojure frameworks for implementing the web service. The Friend framework is used for authentication.
The characteristics of the service are summarized in the following table.
| init.d script | cimi |
| language | clojure (lisp on the Java VM) |
| APIs | REST, python, and libcloud |
| log file(s) | /var/log/stratuslab/cimi/* |
| initial password | see cimi.log log file |
| 9200 | open only on localhost (HTTP) |
Table: CIMI Server Characteristics
Installation
As for all of the StratusLab services, the installation consists of the
installation of an RPM package followed by configuration of the service.
This process is automated via the stratus-install command.
Warning
The CIMI service depends on the Couchbase database. You must install and configure Couchbase before tying to install the CIMI service.
Logged in as “root” on the “cloud entry point” machine, execute the following command to install the CIMI service:
$ stratus-install --cimi
This should complete without error and start the cimi service. You can check that it is running with the command:
$ service cimi status

START_INI      =  /opt/stratuslab/cimi/start.ini
JETTY_HOME     =  /opt/stratuslab/cimi
...

Jetty running pid=2099
This gives a lot of information about the service configuration and ends with giving the PID of the running service. If this is not running, then no PID will be given.
Configuration
nginx
The CIMI service runs behind an nginx proxy. The installation of nginx and the necessary configuration will all be done automatically by the StratusLab RPM packages.
The default installation will generate a self-signed certificate for
the service. If you want to use a certificate signed by an accredited
certificate authority, you must install it in the
/etc/stratuslab/nginx-proxy/ directory. The certificate and key
must be in the cert.pem and cert.key files, respectively.
Administrator Account
The details for configuring the authentication for the service are
explained in the next chapter. For now, it is enough to know that an
administrator account is created the first time the service starts. The
username is “admin”; the randomly-generated password is available in the
service log /var/log/stratuslab/cimi/cimi.log.
Testing the CIMI Service
The “CloudEntryPoint” resource as well as a few others are visible to anyone, even those without an account on the cloud. We can verify that the service is working correctly by retrieving the CloudEntryPoint.
To do this via the command line, just use curl on the base URL of
the service:
$ curl -s --insecure https://cimi.example.org/ \
    python -mjson.tool

{
    ...

    "baseURI": "https://onevm-142.lal.in2p3.fr:443/",
    "created": "2013-11-12T16:10:47.990Z",
    "id": "CloudEntryPoint",
    "jobs": {
        "href": "Job"
    },
    "machineConfigs": {
        "href": "MachineConfiguration"
    },
    "resourceURI": "http://schemas.dmtf.org/cimi/1/CloudEntryPoint",

    ...
}
This resource (in JSON format) contains the list of all of the cloud resource collecitons supported by this cloud infrastructure, along with relative URLs (in the “href” field) for those resource collections. It also contains metadata concerning the cloud infrastructure itself.
Note
The first access to the server takes some time to respond because the server is dynamically compiling the source clojure files and initializing the database. Subsequent accesses to the service should be much faster.
There is also a rudimentary web browser interface provided by the service. Point a browser at the URL http://cloud.example.org/cimi/webui, replacing the hostname with your own. You should see an HTML representation of the CloudEntryPoint as in the following screenshot.
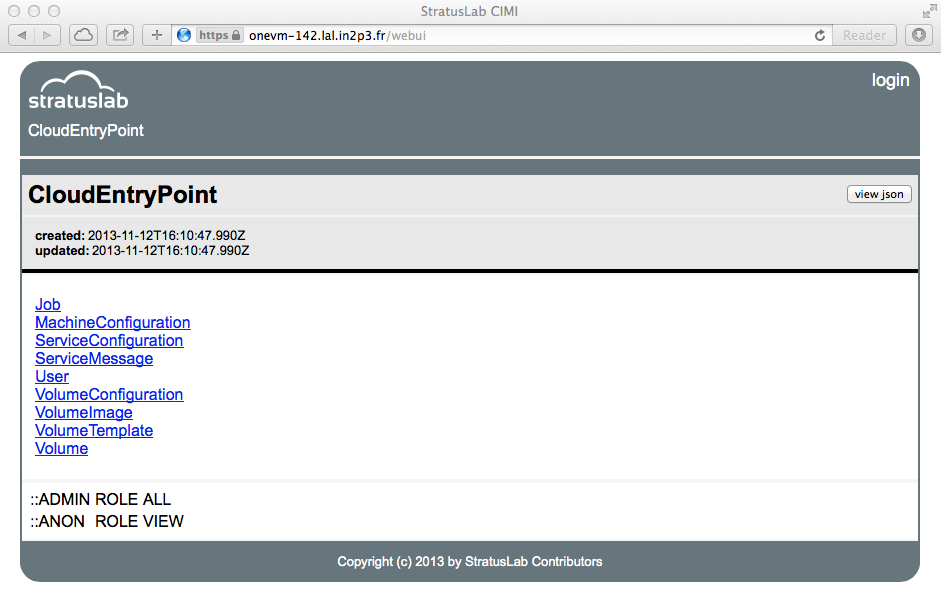
CloudEntryPoint Viewed in CIMI Web Browser Interface
Verify Administrator Account
You will be using the administrator account to update the service configuration. To verify that it works, first recover the administrator’s account password from the service log. You should find a message in the log like the following:
... User/admin entry created; initial password is 6GfRtIeWVygK
The username of this initial account is always “admin”; the “6G...” value is the generated password. Use the value from your log file.
To login as the administrator from the web interface, click on the “login” link in the upper right corner, fill in the username and password on the form, and then click the “login” button. If the login was successful, then you should be redirected back to the CloudEntryPoint, but you will see your login information on the right side of the header.

Logged in User Information
Note
You can always see your full authentication information by visiting the URL https://cloud.example.org/cimi/authn. The most important fields are the “identity” field (giving your username) and the “roles” field (giving your authorizations).
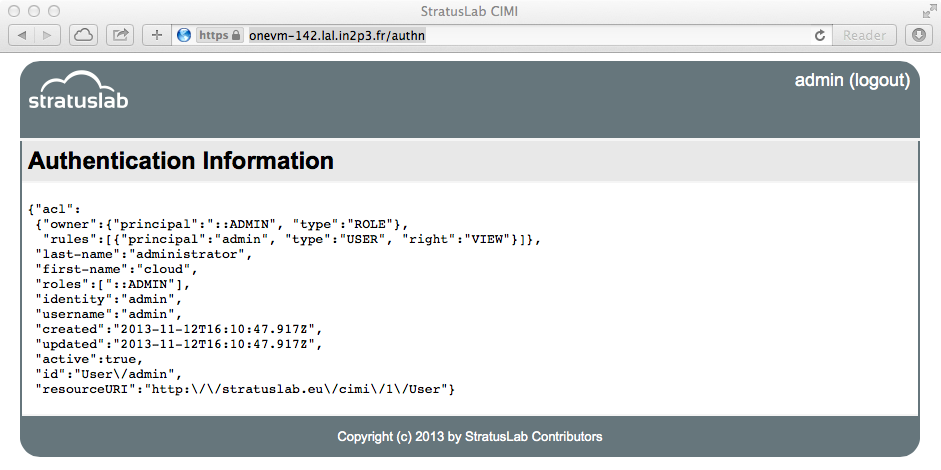
Full Authentication Information
If you can see pages similar to the screenshots, the administrator of the CIMI is correctly configured. However, you will likely want to change the password of the administrator account. Now that you are logged into the server, you can do this.
Return to the CloudEntryPoint using the web browser interface (i.e. the URL ending with “webui”). From there, click on “User”. This brings up the list of user records; only the “admin” account should be listed. Then click on “admin” to view the user record. You should see a page listing characteristics of the “admin” account, notably there will be a field “password” containing the bcrypt hash of the current administrator password.
You should see three buttons on the right of the page: “view json”, “edit”, and “delete”. You will want to click on the “edit” button which will bring up a JSON editor with the current contents of the “admin” user.
However, before doing this, you want to generate the bcrypt hash for a new (memorable) password. This can be done with python using the following command:
$ python -c "
> import bcrypt
> h=bcrypt.hashpw('hello', bcrypt.gensalt())
> print h
> "
$2a$12$zvS7axGrws6/YH2AuIyXpufc174KV5bjBTp.vo400sGZsehP7CpFS
You may have to install the package “py-bcrypt” on CentOS for this to work. It returns the hash of your password. Change the ‘hello’ in the example to the password you want to use.
Now that you have a new password, click on the “edit” button, change the value of the password field to the hash value you’ve generated and click on the “save” button. You should be redirected back to the same page, but the password field will have been updated.
You can now logout via the “logout” link and log back into the service (with your new password!) using the same procedure as before.
Service Messages
As a further example of how to use the web interface (which you will use to handle service configuration), you can create “ServiceMessage” resources on the server.
The ServiceMessage resources are visible to anyone but can only be created by the administrator. These messages are intended to provide general service information to users, like the MOTD (message of the day) text on many operating systems.
From the CloudEntryPoint, click on the “ServiceMessage” link. This should bring up an empty list of ServiceMessage resources. Click on the “add” button, which will bring up the same JSON editor you saw previously.
Add something like the following to the editor panel:
{
  "name": "StratusLab is Alive!",
 "description": "Deploying StratusLab clouds is fun."
}
and then click on the “save” button. You should then see a summary panel of the message along with metadata that was added to the entry. You can view JSON for the entry with the “view json” button, update it with the “edit” button, or delete it with the “delete” button.
If you go back to the ServiceMessageCollection, you will see the entry in the list.
For ServiceMessage resources the “name” field is treated like a title and the “description” gives the full message.